Paper Crafts Kids Love: Folding, Cutting, and Creative Fun
Ages 3-10 Low Mess Budget Friendly
Paper is the workhorse of kids crafts. It is cheap, it is everywhere, and you can fold it, cut it, tear it, crumple it, weave it, roll it, and glue it into just about anything. We go through more paper than any other supply in our house, and I have never once regretted buying that bulk pack of construction paper.
These projects range from simple tearing activities for toddlers to more involved folding and cutting for older kids. All of them produce minimal mess, which makes paper the material I reach for first on days when I want crafting without the cleanup.
1. Paper Airplanes (The Real Activity)
What You Need
- Printer paper or lightweight paper
- Markers or stickers for decorating (optional)
Ages 4-10 No Mess
Paper airplanes seem too basic to list, but making and testing different designs fills a solid hour. Fold a dart, fold a glider, try adding wing flaps, test them all, measure distances, adjust and repeat. Engineering for kids disguised as throwing things across the room. My son keeps a "distance record" taped to the hallway wall.
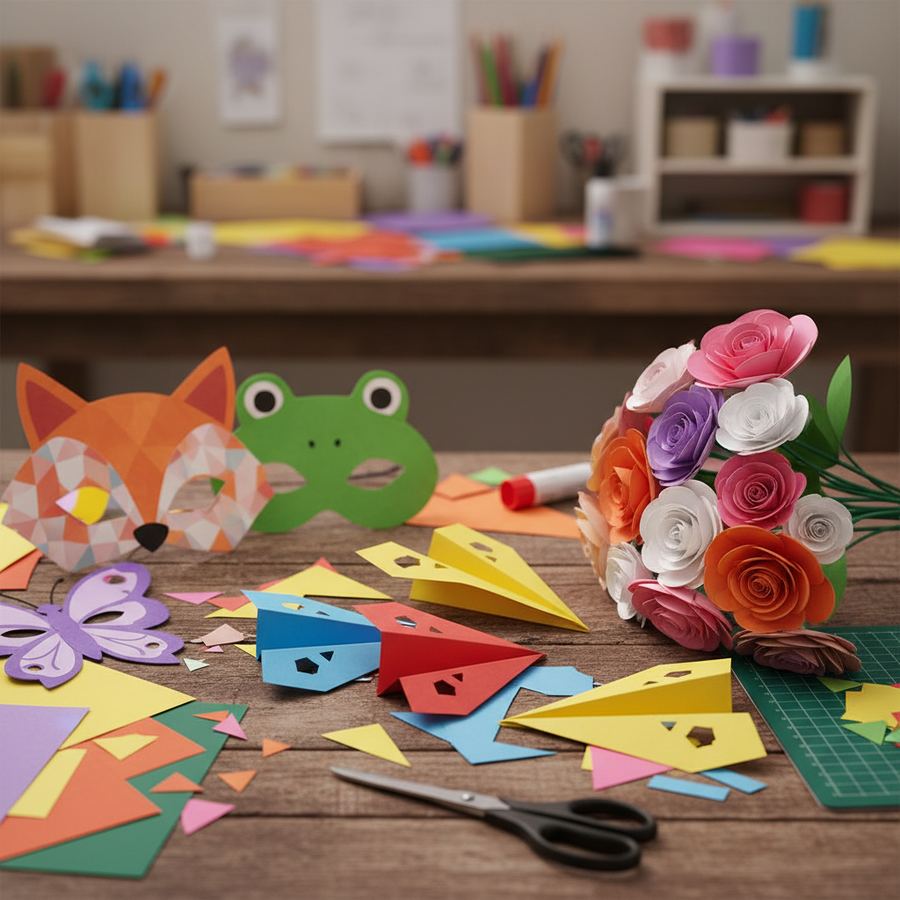
2. Paper Bag Masks
What You Need
- Brown paper grocery bags (large enough to fit over a head)
- Scissors
- Markers, paint, or crayons
- Construction paper scraps
- Glue stick
Ages 4-9 Low Mess
Cut eye holes in a paper bag, and suddenly you have a mask that covers the whole head. Draw or glue on features: a monster face, an animal, a robot, a superhero, an alien. The bags are big enough for really bold designs, and kids love wearing them and becoming their character.
An adult should cut the eye holes (mark them by having the child put the bag on and gently pressing where their eyes are). After that, decorating is all them. Multiple masks usually lead to a puppet show or play.
3. Paper Snowflakes
What You Need
- White paper (printer paper or coffee filters)
- Scissors
Ages 5-10 No Mess
Fold paper into quarters or sixths, cut shapes along the edges and folds, unfold to reveal a symmetrical snowflake. This is one of those crafts that is satisfying at any skill level. Simple cuts make simple snowflakes. Complex cuts make intricate ones. Every single snowflake comes out different, and the unfolding moment never gets old.
Coffee filters work especially well because they are already round and the thin paper is easy for younger hands to cut. Tape snowflakes to windows for an instant winter display, or string them together for a garland.
4. Accordion Fold Animals
What You Need
- Construction paper
- Scissors
- Glue stick
- Markers
- Googly eyes (optional)
Ages 4-8 Low Mess
Fold a strip of paper back and forth to make an accordion body. Glue on a paper head, tail, and legs. Caterpillars are the easiest version. Snakes, dogs, and birds all work with variations on the same concept. The accordion fold gives the body a springy, three-dimensional quality that flat paper crafts lack.
This is a good one for practicing folding skills. The folds do not need to be perfect. A slightly uneven caterpillar still looks like a caterpillar.
5. Paper Plate Masks
What You Need
- Paper plates
- Scissors
- Popsicle stick or straw (for a handle)
- Tape
- Markers, paint, or crayons
- Construction paper, feathers, or yarn for details
Ages 3-8 Low Mess
Cut eye holes in a paper plate, tape a popsicle stick handle to the bottom, and decorate. These are faster to make than paper bag masks and easier for younger kids since the plate already provides a face-sized canvas. Animal masks are popular. My daughter made a very convincing owl by gluing on cut paper feathers and big round paper eyes.
For a masquerade theme, add glitter (if you are feeling brave about cleanup) or sequins. For the low-mess version, markers and construction paper do the job just fine.
6. Paper Chain People
What You Need
- Paper (any kind)
- Scissors
- Markers or crayons
Ages 5-9 No Mess
Fold a strip of paper accordion-style. Draw half a person shape along one folded edge, making sure the hands and feet extend to the fold. Cut around the shape, unfold, and you have a chain of connected people. Decorate each one differently: family members, friends, characters from a story.
The tricky part for beginners is understanding which edge to keep connected. Do a demonstration first. Once kids get the concept, they will start experimenting with different shapes. One of mine made a chain of cats holding tails.
7. Torn Paper Mosaic
What You Need
- Construction paper or magazine pages (for tearing)
- Cardstock or heavy paper (for the base)
- Glue stick
- Pencil (optional, for drawing the outline first)
Ages 3-8 Low Mess
Tear colored paper into small pieces and glue them down to fill in a shape or picture. No scissors needed, which makes this perfect for younger kids still developing cutting skills. Draw a simple outline on the base paper (a heart, a rainbow, a tree) and fill it in with torn pieces, sorting by color.
The tearing is good for hand strength and fine motor development, and there is something relaxing about it. I have done this alongside my kids and found it surprisingly meditative. The easy crafts page has more simple projects in this vein.
8. Origami Bookmarks
What You Need
- Square paper (origami paper or cut printer paper into squares)
- Markers for decorating
- Small stickers (optional)
Ages 6-10 No Mess
A corner bookmark is one of the simplest origami projects and it is actually useful. Fold a square of paper into a triangle. Fold the two bottom corners up to the top point. Unfold them, then fold the top layer of the top point down. Tuck the bottom corners into the pocket you just made. You now have a triangle that slips over the corner of a page.
Decorate the bookmark as a monster (add teeth and eyes to the open edge), an animal, or just make it colorful. These are great gifts for classmates, and kids who like precision work will enjoy getting the folds crisp. For detailed folding instructions, Origami-Instructions.com has free diagrams for dozens of kid-friendly models.
9. Paper Flowers
What You Need
- Tissue paper or crepe paper
- Pipe cleaners or green straws (for stems)
- Scissors
- Tape or twist ties
Ages 4-10 Low Mess
Stack three to five sheets of tissue paper, accordion-fold them, pinch the center and twist a pipe cleaner around it, then gently separate and fluff each layer. Different colors and sizes give different effects. A bouquet of these in a jar makes a genuinely nice table decoration. Easy enough for young kids with help, and older kids can experiment with petal shapes and color combinations.
Working with Paper: Practical Notes
Construction paper is the standard, but do not overlook other sources: wrapping paper, junk mail, cereal boxes, newspaper, and brown paper bags all work. Heavier paper (cardstock) is better for standing structures. Thin paper (tissue, crepe) is better for flowers and translucent effects. Keep a scrap box for leftover pieces. Kids often find the scraps more inspiring than a fresh sheet.
For rainy day crafting sessions where you want to stay indoors all afternoon, the rainy day crafts page has more ideas that pair well with these. And if your paper supply budget is limited, check out the dollar store crafts guide for what is worth picking up on the cheap. The Crayola craft ideas page also has free printable templates that work well as starting points for paper projects.